Using coc extensions
The main reason for having extensions is to achieve a better user experience. Some community-provided language servers are less straightforward and less easy to use than VS Code extensions. Coc extensions can be forked from VS Code extensions and should provide a similar or better user experience.
Compared with configured language servers, extensions support more features.
-
Extensions can contribute properties to the
coc-settings.jsonschema, so like in VS Code you get completion and validation support when you havecoc-jsoninstalled.
-
Extensions can contribute commands (like VS Code). You can use coc commands in different ways:
-
Use the
:CocList commandscommand to open the command list and choose the one you need.
-
Use
:CocCommandwith<tab>for command line completion. -
An example configuration that maps the custom command
Tsctotsserver.watchBuild:command! -nargs=0 Tsc :CocCommand tsserver.watchBuild
-
-
Extensions can contribute JSON schemas (loaded by coc-json).
-
Extensions can contribute snippets that can be loaded by the coc-snippets extension.
-
Extensions can specify additional client options, such as
fileEventsfor watching files (requires watchman to be installed) andmiddleware, which can be used to fix results returned from the language server.
For a deeper dive into the purpose and implementation of coc extensions, please see How to write a coc.nvim extension.
- Coc extensions use coc.nvim as a dependency instead of VS Code.
- Coc extensions support language server features by using the API from coc.nvim instead of vscode-languageclient, which can only be used with VS Code.
- Coc extensions support some features of VS Code extensions:
-
activateanddeactivateAPIs. -
activationEventsin package.json. - Configuration support:
contributes.configurationin package.json. - Commands support:
contributes.commands. - JSON validation support via JSON Schema:
contributes.jsonValidation. - Snippets support.
-
Coc.nvim will try to load JavaScript files from the coc-extensions folder under g:coc_config_home (default ~/.config/nvim). Each JavaScript file should be a coc.nvim extension.
An example coc extension that converts the character at the cursor position to its Unicode code point:
const { commands, workspace } = require('coc.nvim')

exports.activate = context => {
  let { nvim } = workspace
  context.subscriptions.push(commands.registerCommand('code.convertCodePoint', async () => {
    let [pos, line] = await nvim.eval('[coc#util#cursor(), getline(".")]')
    let curr = pos[1] == 0 ? '' : line.slice(pos[1], pos[1] + 1)
    let code = curr.codePointAt(0)
    let str = code.toString(16)
    str = str.length == 4 ? str : '0'.repeat(4 - str.length) + str
    let result = `${line.slice(0, pos[1])}${'\\u' + str}${line.slice(pos[1] + 1)}`
    await nvim.call('setline', ['.', result])
  }))
}
Note: single-file extensions can't be managed by the extensions list. To contribute extension metadata, create a ${name}.json file alongside ${name}.js with activationEvents and contributes properties.
Using :CocInstall:
:CocInstall coc-json coc-cssOne or more extension names can be provided.
Note: VS Code extensions can't be used by coc.nvim for now.
Extensions will be loaded and activated after the install succeeds.
Note: you can add extension names to the g:coc_global_extensions variable, and coc will install the missing extensions after the coc.nvim service starts.
For example:
let g:coc_global_extensions = ['coc-json', 'coc-git']To install extensions with a shell script, use a command like:
# install coc-json & coc-html and exit
vim -c 'CocInstall -sync coc-json coc-html|q'You can customize the npm registry for coc.nvim by adding coc.nvim:registry to ~/.npmrc:
coc.nvim:registry=https://registry.npmjs.org/If you need to roll back to a specific extension version, or just want to install a particular version, add @version to your install command.
Using coc-prettier as an example, to install version 1.1.17, run:
:CocInstall coc-prettier@1.1.17You can manage coc extensions with a vim plugin manager like vim-plug. Coc will try to load coc extensions from your &rtp.
Example for coc-tsserver:
Plug 'neoclide/coc-tsserver', {'do': 'yarn install --frozen-lockfile'}After adding this to your vimrc, run PlugInstall.
Note: For coc extensions written in TypeScript, you have to build them when installing from git. Most of the time you should install yarn and run yarn install --frozen-lockfile in the extension root.
The limitation is that you can't uninstall these extensions with :CocUninstall, and automatic updates are not available.
Use the command :CocUpdate or :CocUpdateSync to update extensions installed by :CocInstall to the latest version.
For extensions loaded from vim's rtp, update them with your plugin manager.
To enable automatic updates, set the extensions.updateCheck configuration to "daily" or "weekly" (defaults to "never").
To upgrade extensions with a shell script, use a command like:
vim -c 'CocUpdateSync|q'Use the :CocUninstall vim command for extensions installed by :CocInstall, for example:
:CocUninstall coc-cssRun :CocList extensions to open the CocList buffer, which looks like:
:CocList extensions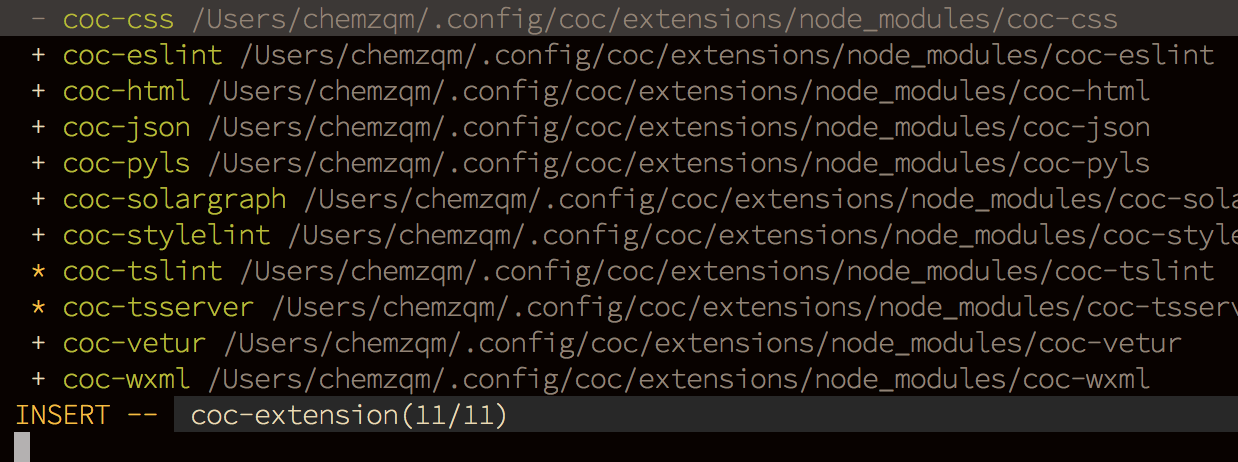
-
?means the extension isn't recognized by coc.nvim -
*means the extension is activated -
+means the extension's package.json is loaded, but the extension isn't activated -
-means the extension is disabled
Supported actions (press <Tab> to open the action menu):
-
toggle(default action): activates/deactivates the selected extension(s). -
enable: enables the selected extension(s). -
disable: disables the selected extension(s). -
reload: reloads the selected extension(s). -
uninstall: removes the selected extension(s). -
lock: toggles the lock of an extension; locked extensions won't be updated by:CocUpdate.
If an extension throws uncaught errors, you can see the error message with :messages.
For extensions using a language server, you can use the output channel. Check out https://github.com/neoclide/coc.nvim/wiki/Debug-language-server#using-output-channel.
Use console to log messages to coc.nvim's log file; supported methods include debug, log, error, info, and warn. Check out :h :CocOpenLog.
You can also use Chrome to debug extensions; check out https://github.com/neoclide/coc.nvim/wiki/Debug-coc.nvim.
You can find available coc extensions by searching coc.nvim on npm, or use coc-marketplace, which can search for and install extensions directly in coc.nvim.
-
coc-alex for
alex -
coc-angular for
angular. -
coc-ansible for
yaml.ansible, use ansible-language-server (scoped packages:@yaegassy/coc-ansible) -
coc-astro for
astro, use @astrojs/language-server. (scoped packages:@yaegassy/coc-astro) - coc-biome, biome extension
-
coc-black-formatter for
python, based on microsoft/vscode-black-formatter's language server extension. (scoped packages:@yaegassy/coc-black-formatter) -
coc-blade for
blade; a Laravel Blade templates extension that provides "formatter", "linter", "completion", and more. - coc-browser for browser word completion.
- coc-calc expression calculation extension.
- coc-cfn-lint for CloudFormation linting with cfn-python-lint.
- coc-clangd for C/C++/Objective-C, using clangd.
-
coc-clang-format-style-options a coc.nvim extension that helps you write
.clang-formatfiles more easily. - coc-class-css CSS class selector completion in HTML, Svelte, Vue, and React.
- coc-cmake for CMake code completion.
- coc-copilot for GitHub Copilot completion.
-
coc-css for
css,scssandless. - coc-cssmodules CSS Modules IntelliSense.
- coc-deno for deno, a fork of vscode_deno.
- coc-diagnostic for all filetypes, using diagnostic-languageserver.
- coc-discord Discord rich presence for coc.nvim.
- coc-discord-rpc fully customizable Discord RPC integration with support for 130+ of the most popular languages.
-
coc-dash-complete Press
-to trigger buffer source completion. -
coc-debian for
debianfiles (control,copyright,changelog,watch, etc.), providing support for Debian packaging. -
coc-dot-complete Press
.to trigger buffer source completion. (no longer maintained) -
coc-docker for
dockerfile. -
coc-dlang for
dcode completion, based on serve-d. - coc-ecdict ECDICT extension.
-
coc-elixir for
elixir, based on elixir-ls. - coc-ember for Ember projects; wraps @lifeart's ember-language-server.
- coc-glint for typed Ember projects; wraps typed-ember's glint-language-server.
- coc-emmet provides Emmet suggestions in the completion list.
-
coc-erlang_ls for
erlang, based on erlang_ls -
coc-esbonio for
rst(reStructuredText), using the esbonio (Sphinx) language server extension. - coc-eslint ESLint extension for coc.nvim.
- coc-explorer file explorer extension.
- coc-floaterm for vim-floaterm integration
-
coc-flow for
flow. -
coc-flutter for
flutter. -
coc-fsharp for
fsharp. - coc-fzf-preview provides powerful fzf integration.
- coc-gist Gist management.
- coc-git provides git integration.
-
coc-glslx for
glsl, use glslx. -
coc-go for
go, use gopls. - coc-golines golines (Go formatter) extension.
-
coc-graphql for
graphql. -
coc-haxe for
haXe. - coc-highlight provides default document symbol highlighting and color support.
-
coc-html for
html,handlebarsandrazor. -
coc-htmldjango for
htmldjango; a Django templates (htmldjango) extension that provides "formatter", "linter", and more. -
coc-htmlhint for
html, integrating the HTMLHint static analysis tool. - coc-html-css-support for HTML id and class attribute completion.
-
coc-intelephense for
php, a fork of vscode-intelephense. (scoped packages:@yaegassy/coc-intelephense) -
coc-java for
java, use eclipse.jdt.ls. -
coc-jedi for
python, use jedi-language-server. -
coc-json for
json. -
coc-julia for
julia. -
coc-just-complete Press
_to trigger buffer source completion. -
coc-laravel for Laravel projects (
php). (scoped packages:@yaegassy/coc-laravel) - coc-lists provides some basic lists like fzf.vim.
- coc-lightbulb code action 💡 for coc.nvim.
- coc-lsp-wl for Wolfram Mathematica, a fork of vscode-lsp-wl.
- coc-ltex grammar/spell checker.
-
coc-lua for
lua. - coc-markdownlint for Markdown linting.
- coc-markdown-preview-enhanced Markdown Preview Enhanced for coc.nvim
- coc-markmap markdown + mindmap for coc.nvim
-
coc-metals for Scala, using
Metals. -
coc-meson for
mesonbuild -
coc-mypy for
python, based on microsoft/vscode-mypy's language server extension. (scoped packages:@yaegassy/coc-mypy) - coc-nav provides the context of the cursor position.
-
coc-nginx for
nginx, use nginx-language-server and nginxfmt (scoped packages:@yaegassy/coc-nginx) -
coc-nix for
nixos. -
coc-omnisharp for
csharpandvisualbasic. -
coc-perl for
perl. -
coc-phpactor for
php, using phpactor -
coc-phpls for
php, use intelephense-docs. -
coc-phpstan for
php, use phpstan (scoped packages:@yaegassy/coc-phpstan) -
coc-php-cs-fixer for
php, PHP CS Fixer and Laravel Pint extension. -
coc-psalm for
php, use psalm language server. - coc-powershell for PowerShellEditorService integration.
- coc-prettier a fork of prettier-vscode.
- coc-prisma for Prisma schema integration.
-
coc-pydocstring for
python, using the doq extension (Python docstring generator). -
coc-pylsp for
python, use pylsp(python-lsp-server). (scoped packages:@yaegassy/coc-pylsp) -
coc-pyright for
python, Pyright extension. -
coc-python for
python, extension forked from vscode-python. (no longer maintained) -
coc-r-lsp for
r, use R languageserver. -
coc-reason for
reasonml -
coc-rls for
rust, use Rust Language Server (deprecated and archived) -
coc-rome for
javascript,typescript,json, and more, usingRome. -
coc-ruff for
python, ruff-lsp (ruff) extension. (scoped packages:@yaegassy/coc-ruff) -
coc-rust-analyzer for
rust, use rust-analyzer -
coc-sh for
bashusing bash-language-server. - coc-stylelintplus for linting CSS and CSS preprocessed formats
- coc-stylelint for linting CSS and CSS preprocessed formats
- coc-snippets provides snippets solution.
-
coc-solargraph for
ruby, use solargraph. - coc-solidity for solidity
-
coc-sourcekit for
Swift - coc-spell-checker A basic spell checker that works well with camelCase code
-
coc-sql for
sql. -
coc-sqlfluff for
sql, SQLFluff (a SQL linter and auto-formatter for humans) extension. - coc-stylua Stylua (Lua formatter) extension.
- coc-sumneko-lua Lua extension using the sumneko lua-language-server.
-
coc-svelte for
svelte. -
coc-svg for
svg. - coc-swagger for improved Swagger/OpenAPI spec authoring experience.
- coc-symbol-line Symbols outline for coc.nvim.
- coc-tabnine for tabnine.
-
coc-tailwindcss for
tailwindcss. -
coc-tailwindcss3 for
tailwindcss. (scoped packages:@yaegassy/coc-tailwindcss3). - coc-tasks for asynctasks.vim integration.
-
coc-texlab for
LaTeXusing TexLab. -
coc-thrift-syntax-support for
thrift. -
coc-toml for
tomlusing taplo. - coc-translator language translation extension.
-
coc-tsserver for
javascriptandtypescript. - coc-twoslash-queries for TypeScript twoslash queries.
- coc-unocss for UnoCSS.
-
coc-vetur for
vue, use vetur. -
coc-volar for
vue, use volar. (scoped packages:@yaegassy/coc-volar). -
coc-vimlsp for
viml. - coc-webview uses an external browser to support the webview.
- coc-wolfram for Wolfram LSP.
-
coc-xml for
xml, use lsp4xml. -
coc-yaml for
yaml. - coc-yank provides yank highlights and history.
-
coc-zig for
zigfiles. -
coc-zls ZLS extension for
zig. - coc-vscode-loader runs VS Code extensions seamlessly in coc.nvim.
Tips: use :CocConfig to edit the configuration file. Completion and validation are supported after coc-json is installed.