
WireGuard technically does not have strict roles such as "client" or "server" like other VPNs. All peers in a WireGuard network are capable of performing task of a "client" or a "server". Hence, there are several common topologies used to configure a WireGuard network such as Point to Point, Hub and Spoke, Point to Site, and Site to Site [1].
In this guide, we will tackle a problem commonly faced in self-hosting, which is how to expose your service to the internet and bypass CGNAT enforced by your Internet Service Provider (ISP). To do that, we will use the Hub and Spoke topology described in [1] and do a slight modification to fit our needs. However, please note you would need to rent a VPS that has a public IP. This VPS does not need to have a high specifications as it only acts as a hub that forwards traffic to your home server in which where you actually host all your services.
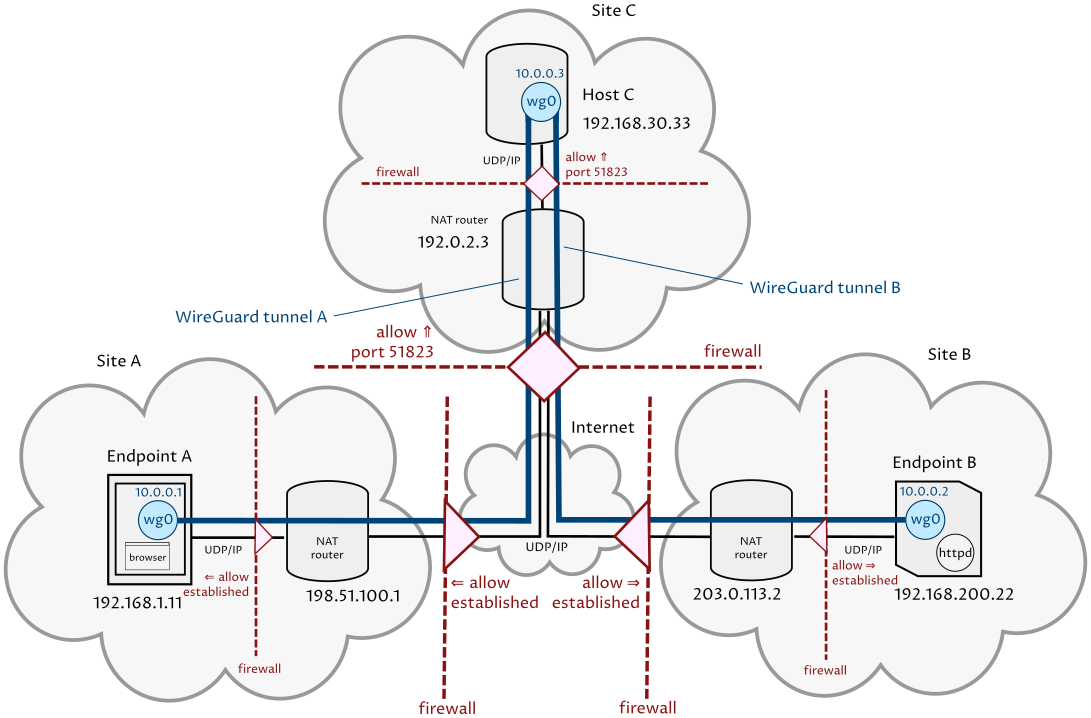
In a Hub and Spoke, also known as the Star topology, two clients running WireGuard are connected through a host which also running WireGuard. This two client usually are behind firewalls and NAT that does not allow initiating connection from the outside. However, the host should not have this limitation. The host acts as a router for the WireGuard clients in the network by forwarding the packets between clients . You can have more than two clients with this topology, but each connection between clients always come through that one host.
In this guide, we will only configure one client and one host as that will suffice our needs. Your home server will be the "client" or "endpoint" and the public VPS will be the "host". The people that will connect your services through the internet is not technically considered the "client" as they will not be part of the WireGuard network. They will access your services through the "host" by accessing its public IP, then the "host" will forward the traffic to your home server, the "client", with port-forwarding. The response from your home server then will be forwarded back by the "host" to the people that initially made the request.
In this guide, we will use the 10.16.0.0/24 subnet for our WireGuard network. The "host", the VPS, will be assigned with the IP of 10.16.0.1 and the client, your home server, with the IP of 10.16.0.2. Note that these are private IPs that can only be accessed within the WireGuard network. People accessing your sevices still need to use the VPS public IP.
We will also use port 51820/udp on the "host" for accepting the WireGuard connection. WireGuard uses UDP for its peers to communicate with each other.
On the "client", we will have a website that exposed on port 8000/tcp.
Install WireGuard on both host and client, and verify the installation
sudo apt install wireguard
wg helpWe will use UFW (Uncomplicated FireWall) as a security measure so that the host only accepts traffic on certain ports. UFW should be already installed on most Linux distributions.
If you are accessing the host through an SSH (which probably is the case if you use a VPS), it is important to make a rule that allow SSH connection first so that your connection does not get interrupted
sudo ufw allow sshThen you can safely enable UFW, and verify if it is active
sudo ufw enable
sudo ufw status
Finally create a rule that allow WireGuard connection through port 51820 on UDP
sudo ufw allow 51820/udpCreate private and public keys for the host and the client. This can be done either in the host or server, as long as WireGuard is installed
wg genkey > host.key
wg pubkey < host.key > host.pub
wg genkey > client.key
wg pubkey < client.key > client.pub
The file host.key and host.pub will contain the private key and public key for the host respectively. Where client.key and client.pub will contain the private key and public key for the client respectively. Write down the keys from each file somewhere else like notepad. These keys will be used inside the WireGuard configuration file for the host and the client.
On both host and client, create a file named wg0.conf inside /etc/wireguard folder as root, and alter its read-write permission to 600
sudo su
nano /etc/wireguard/wg0.conf
chmod 600 /etc/wireguard/wg0.conf
exitNote that you can name the configuration file whatever you want. The filename (without the extension), which here is wg0, will also be the name of the virtual network adapter of the WireGuard network.
Enable WireGuard via system on both host and client, and verify its status
sudo systemctl enable wg-quick@wg0.service
sudo systemctl start wg-quick@wg0.service
sudo wg
Test connection from client to host
ping 10.16.0.1Test connection from host to client
ping 10.16.0.2If you can successfully ping the client from the host and vice versa, you already successfully established the WireGuard network. However, for the host to be able to forward incoming traffic to the client we need to enable and setup port forwarding. First, enable port forwarding on UFW configuration file located in /etc/ufw/sysctl.conf
sudo nano /etc/ufw/sysctl.confUn-comment these lines on that file
...
#net/ipv4/ip_forward=1
#net/ipv6/conf/default/forwarding=1
#net/ipv6/conf/all/forwarding=1
...
so they become like this
...
net/ipv4/ip_forward=1
net/ipv6/conf/default/forwarding=1
net/ipv6/conf/all/forwarding=1
...
Restart UFW for the changes to take effect
sudo systemctl restart ufwFirst, create a rule on UFW to allow forwarding traffic to port 8000/tcp on the client (10.16.0.2)
sudo ufw route allow to 10.16.0.2 port 8000 proto tcpThen create a rule to allow http access to the host
sudo ufw allow httpAdd port forwarding and packet masquerading rules on /etc/wireguard/wg0.conf
sudo nano /etc/wireguard/wg0.confRestart WireGuard for the changes to take effect
sudo systemctl restart wg-quick@wg0.serviceTry to access the website from the VPS public IP in your browser to see if everything works correctly.
[1] https://www.procustodibus.com/blog/2020/10/wireguard-topologies
[2] https://www.procustodibus.com/blog/2020/11/wireguard-hub-and-spoke-config
[3] https://www.procustodibus.com/blog/2021/05/wireguard-ufw