原文地址 翻译:DeveloperLx

如果你想了解
NSCollectionView
的高级特性,恭喜你来对了地方。这里是第二部分的教程,关于OS X中Collection View的高级特性,你已经深入到了collection view所围绕的世界中。
在这篇教程中,你将学到如何:
- 添加,删除,移动,以及重新排列项目
- 实现拖拽collection view
- 调整选择和高亮的效果
- 在collection view中使用动画
- 实现实现黏性的section头
你需要了解关于
NSCollectionView
的基础知识,以及来自于
Collection View教程
的项目相关的内容。
你将要构建的app叫做 SlidesPro ,他会从之前教程撂下的地方再捡起来再继续。
在 这里 下载 SlidesPro 的初始项目。
运行项目。

在这一部分,你将会浏览添加新的item到collection的步骤。
在实现相应的功能之前,你无法向collection view添加任何内容。好在你是一个开发者!现在这里需要一个按钮,点击它展示一个标准的打开面板,来选择你想要的图片。
打开 Main.storyboard 并拖拽一个 Push Button 到collection view的底部。在 Attributes Inspector 中,设置它的 Title 为 Add ,并取消勾选 Enabled 。

选择 Editor \ Resolve Auto Layout Issues \ Add Missing Constraints 菜单项来设置按钮的 自动布局 约束。
运行项目,查看你是否已得到了button。
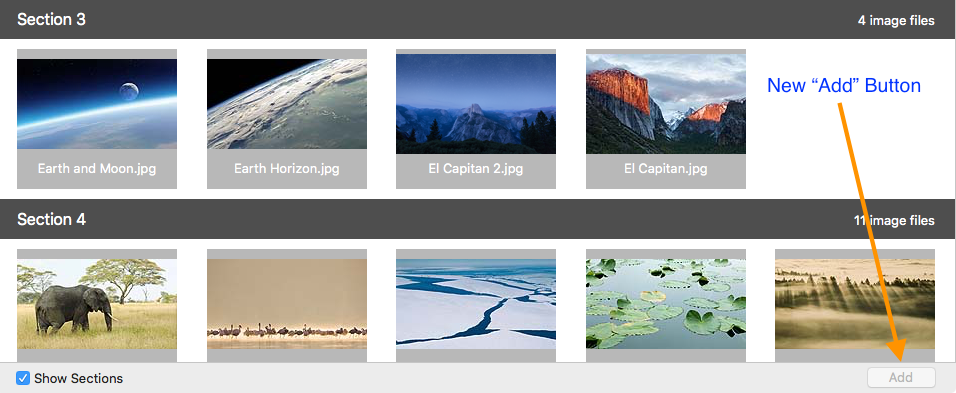
SlidesPro 当你选择了一个item的时候,新的item就被插入到了那个item的index path位置上。之后那个item和其后的item就会被推移到新的item之后。
因此,这个添加按钮就应该只有在某个item被选中时才可使用。
在
ViewController
中,为按钮添加一个
IBOutlet
:
@IBOutlet weak var addSlideButton:NSButton! 接下来,打开 Main.storyboard 并连接outlet到按钮上。
你需要去跟踪item选择的变化,以在ViewController的方法
highlightItems(\_: atIndexPaths:)
中确定这个按钮的打开和关闭。当选择或取消选择一个item时,它就会被两个
NSCollectionViewDelegate
的方法去调用。
为了实现这点,只需要添加一行代码到
highlightItems(\_: atIndexPaths:)
方法中:
  func  highlightItems (selected:Bool,atIndexPaths:Set <NSIndexPath>) {
    .......
    .......
    addSlideButton.enabled = collectionView.selectionIndexPaths。count == 1
  }
这样这个按钮就只会在某个item被选中时才打开了。
运行项目。验证仅当某个item被选中时才能够使用。

添加一个新的item到collection view包含两个步骤。首先,添加item到model中,然后,通知collection view这个变化。
要更新你的model,你需要添加下列的代码到
ImageDirectoryLoader
类中:
  func insertImage(image: ImageFile, atIndexPath: NSIndexPath) {
    let imageIndexInImageFiles = sectionsAttributesArray[atIndexPath.section].sectionOffset + atIndexPath.item
    imageFiles.insert(image, atIndex: imageIndexInImageFiles)
    let sectionToUpdate = atIndexPath.section
    sectionsAttributesArray[sectionToUpdate].sectionLength += 1
    sectionLengthArray[sectionToUpdate] += 1
    if sectionToUpdate < numberOfSections-1 {
      for i in sectionToUpdate+1...numberOfSections-1 {
        sectionsAttributesArray[i].sectionOffset += 1
      }
    }
  }
这个方法插入了新的图片到你的数据model中,并更新相关的内容,这样就保持了你的model保持在一个一致的状态。
添加下列的方法到
ViewController
中。第一个方法会被
IBAction
在动作方法中调用,第二个就是这个动作方法了,它会在点击添加按钮时被调用:
   private func insertAtIndexPathFromURLs(urls: [NSURL], atIndexPath: NSIndexPath) {
    var indexPaths: Set<NSIndexPath> = []
    let section = atIndexPath.section
    var currentItem = atIndexPath.item
    // 1
    for url in urls {
      // 2
      let imageFile = ImageFile(url: url)
      let currentIndexPath = NSIndexPath(forItem: currentItem, inSection: section)
      imageDirectoryLoader.insertImage(imageFile, atIndexPath: currentIndexPath)
      indexPaths.insert(currentIndexPath)
      currentItem += 1
    }
    // 3
    collectionView.insertItemsAtIndexPaths(indexPaths)
  }
@IBAction func addSlide(sender: NSButton) {
// 4
let insertAtIndexPath = collectionView.selectionIndexPaths.first!
//5
let openPanel = NSOpenPanel()
openPanel.canChooseDirectories = false
openPanel.canChooseFiles = true
openPanel.allowsMultipleSelection = true;
openPanel.allowedFileTypes = ["public.image"]
openPanel.beginSheetModalForWindow(self.view.window!) { (response) -> Void in
guard response == NSFileHandlingPanelOKButton else {return}
self.insertAtIndexPathFromURLs(openPanel.URLs, atIndexPath: insertAtIndexPath)
}
}- 迭代从 Open 面板中选择的 URLs 。
-
由每个
URL
创建一个
ImageFile实例,并添加到model中。 - 通知给collection view。
-
根据被选择的那个item的
NSIndexPath觉得从什么地方插入。 -
创建一个
NSOpenPanel,并配置为只允许选择图片文件,然后展示它。
打开
Main.storyboard
并将
addSlide(_:)
这个
IBAction
连接到这个按钮上。
运行项目。
选择第一部分的最后一张图片 -- 在我的系统上是 Desert.jpg 。
点击 Add 按钮。在 Open 面板中找到位于项目根目录下的 My Private Zoo 目录,并选中全部文件。

点击 Open 。app将会在第一部分插入新的图像,从item 2的位置开始, Desert.jpg 之前。

在SlidesPro中,你需要一个移除按钮来移除item,可以把它摆在添加按钮的旁边。最合乎逻辑的实现就是移除掉全部被选中的项目,因此,这个应当当且仅当一个或多个项目被选择是才可用。
接下来就是细节了:多选必须允许你一次同时控制多个图片。
这一部分将一步步地带领你添加这个按钮及打开多选。
打开 Main.storyboard 并选择 Collection View 。并在 Attributes Inspector 中,勾选 Allows Multiple Selection 。

运行项目,并验证多选正常work。
要增加或减少collection的选择,就按住 shift 或 command 键,再来点击各种item,就可以实现多选了。
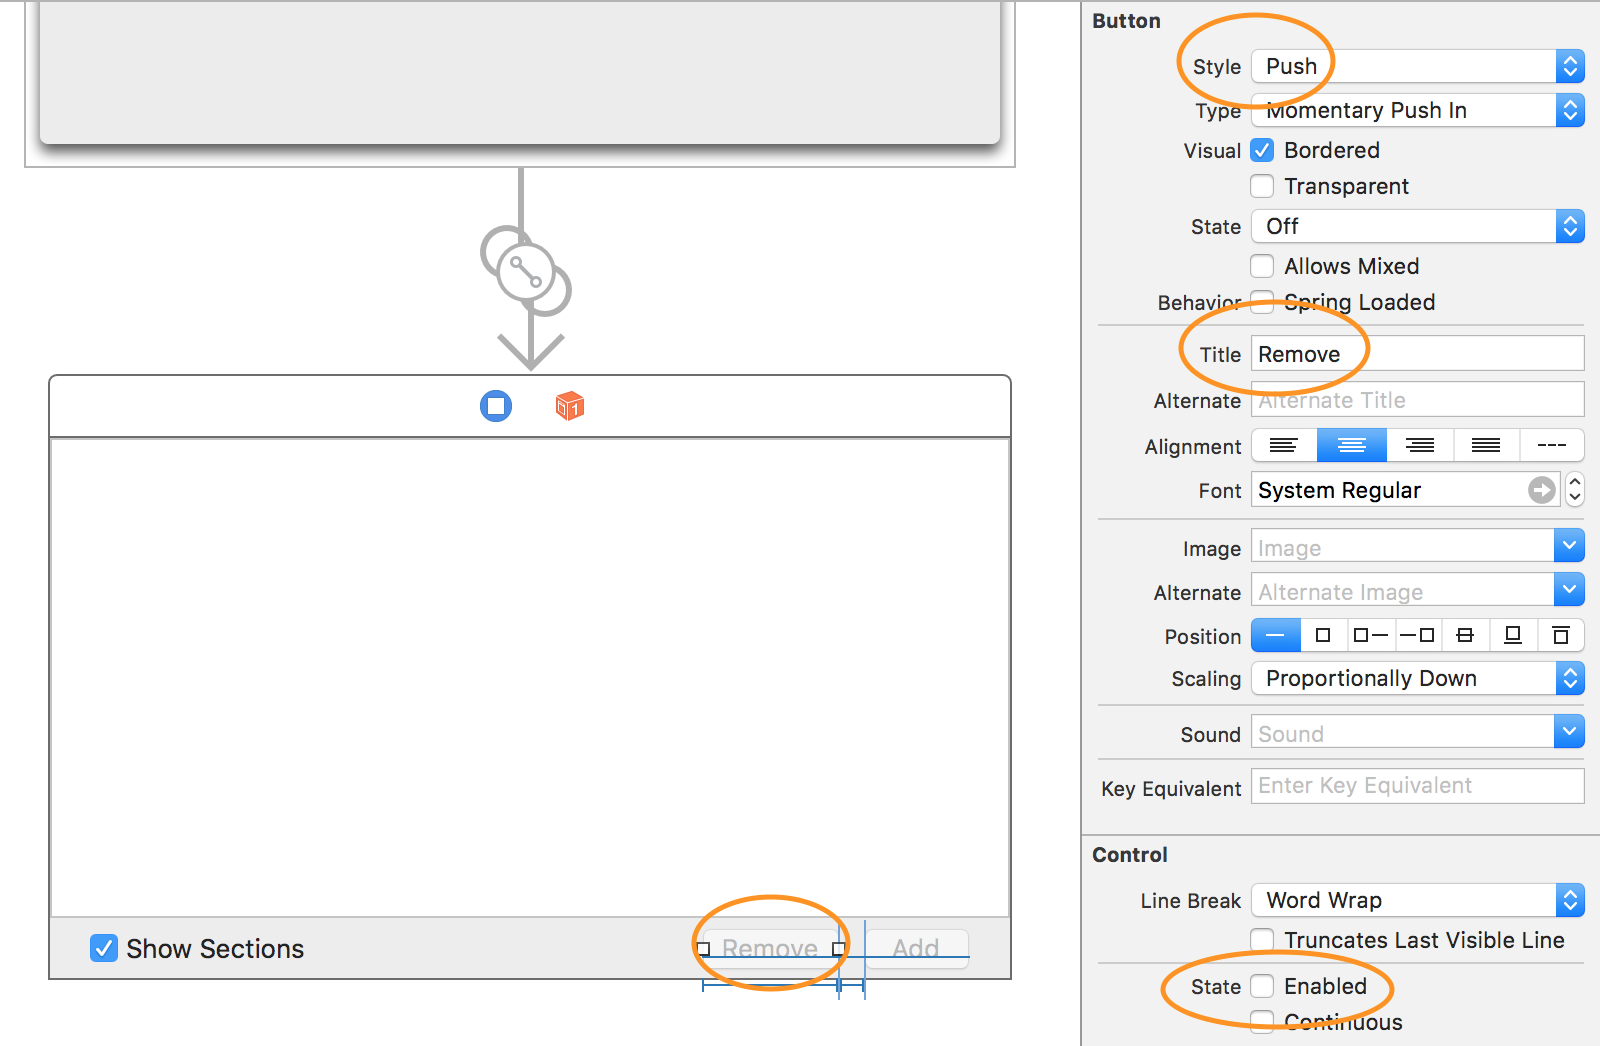
打开 Main.storyboard ,并从 Object Library 中拖拽一个 Push Button ,并将它拖拽到 Add 按钮的左边。
在
Attributes Inspector
中,设置它的
Title
为
Remove
,并取消勾选
Enabled
。
通过选择
Editor \ Resolve Auto Layout Issues \ Add Missing Constraints
菜单项,设置按钮的
Auto Layout
约束。
运行项目。

在
ViewController
中,添加一个
IBOutlet
:
@IBOutlet weak var removeSlideButton: NSButton!接下来,打开 Main.storyboard 并连接这个outlet到按钮上。
在
ViewController
中,
highlightItems(_: atIndexPaths:)
的尾部,添加下列的代码来控制移除按钮的打开/禁用。
  func highlightItems(selected: Bool, atIndexPaths: Set<NSIndexPath>) {
.......
.......
removeSlideButton.enabled = !collectionView.selectionIndexPaths.isEmpty
}
运行项目,然后选择一个item。现在添加按钮和移除按钮都应变为可用了。选中更多的item,这是添加按钮就应变为禁用了,而移除按钮仍保持可用。
现在你就要添加代码来从collection中移除item了。正如添加一样,移除分为两个步骤,你需要首先移除相应图片的model,然后再通知给collection view相应的变化。
要更新model,添加下列的方法到
ImageDirectoryLoader
类的尾部:
  func removeImageAtIndexPath(indexPath: NSIndexPath) -> ImageFile {
let imageIndexInImageFiles = sectionsAttributesArray[indexPath.section].sectionOffset + indexPath.item
let imageFileRemoved = imageFiles.removeAtIndex(imageIndexInImageFiles)
let sectionToUpdate = indexPath.section
sectionsAttributesArray[sectionToUpdate].sectionLength -= 1
if sectionToUpdate < numberOfSections-1 {
for i in sectionToUpdate+1...numberOfSections-1 {
sectionsAttributesArray[i].sectionOffset -= 1
}
}
return imageFileRemoved
}
在
ViewController
中,添加
IBAction
方法,它会在你点击
Remove
按钮时被触发:
  @IBAction func removeSlide(sender: NSButton) {
let selectionIndexPaths = collectionView.selectionIndexPaths
if selectionIndexPaths.isEmpty {
return
}
// 1
var selectionArray = Array(selectionIndexPaths)
selectionArray.sortInPlace({path1, path2 in return path1.compare(path2) == .OrderedDescending})
for itemIndexPath in selectionArray {
// 2
imageDirectoryLoader.removeImageAtIndexPath(itemIndexPath)
}
// 3
collectionView.deleteItemsAtIndexPaths(selectionIndexPaths)
}
上述代码:
- 创建一个数组,依据index path逆序迭代选择的item,这样你就不需要在迭代过程中调整index path了
- 从model中移除选中的item
- 通知collection view item已被移除
现在,打开
Main.storyboard
并连接
removeSlide(_:) IBAction
到移除按钮上。
添加outlet和action后, View Controller 的 Connections Inspector 看起来应当是这个样子:

运行项目。
选择一个或多个图片,并点击 Remove 按钮,来验证是否成功地移除了item。
OS X中有一个最棒的事,是你可以将一个item拖拽或copy到另一个app中。用户是非常期待这个功能的,因此为你的app加入这个特性是一个非常英明的决定。
在SlidesPro中,你将使用拖拽来实现下述的能力:
- 在collection view中移动item
- 从其它app从移动图片到collection view中
- 将collection view中的item拖拽到其它app中
要支持拖拽的功能,你就要实现
NSCollectionViewDelegate
协议中的相关方法,但首先要注册SlidesPro对于拖拽操作的支持。
添加下列的方法到
ViewController
中:
  func registerForDragAndDrop() {
// 1
collectionView.registerForDraggedTypes([NSURLPboardType])
// 2
collectionView.setDraggingSourceOperationMask(NSDragOperation.Every, forLocal: true)
// 3
collectionView.setDraggingSourceOperationMask(NSDragOperation.Every, forLocal: false)
}
上述代码中:
- 注册了SlidesPro可以接收的对象的类型
- 打开了允许item在collection view内进行拖拽的特性
- 打开了允许将item从collection view拖拽到其它app中的特性
在
viewDidLoad()
的尾部,添加下述代码:
registerForDragAndDrop()允许项目。
尝试拖拽一个item -- 但item并未移动。从Finder中拖拽一个图片文件到collection view中...呃。
我让你进行了测试,但你会看到item并没有响应拖拽的事件。为什么会这样?很快你就会知道。
第一个问题是,这里需要一些额外的逻辑来处理拖拽的动作,因此,在
ViewController
的
NSCollectionViewDelegate
extension中添加下列的方法:
  // 1
func collectionView(collectionView: NSCollectionView, canDragItemsAtIndexes indexes: NSIndexSet, withEvent event: NSEvent) -> Bool {
return true
}
// 2
func collectionView(collectionView: NSCollectionView, pasteboardWriterForItemAtIndexPath indexPath: NSIndexPath) -> NSPasteboardWriting? {
let imageFile = imageDirectoryLoader.imageFileForIndexPath(indexPath)
return imageFile.url.absoluteURL
}
上述代码:
-
当collection view将开始一个拖拽操作时,就会发送这个消息给它的
delegate。它的返回值代表了collection view是否指定index path的item允许被拖动。你需要能够拖动任意item,因此你就无条件地返回true。 -
实现这个方法是非常关键的,因为这样collection view才可以成为一个
Drag Source
。如果在第一部分中的方法允许开始拖拽,collection view就会为每个item调用一次这个方法,来为item的底层模型对象请求一个pasteboard writer。这个方法就返回一个实现了
NSPasteboardWriting的自定义对象;在这个case中就是NSURL。返回nil则会阻止拖拽。
运行项目。
尝试拖拽一个item,item移动了...哈利路亚!
获取我说得太快了?当你尝试把item拖拽到collection view上一个不同的位置的时候,它却又弹回去了。Why?因为你还未将collection view设置为一个 Drop Target 。
现在尝试把一个item拖拽到Finder中;你就会发现一个新的基于源 URL 的图片文件创建了出来。你 已经 取得了巨大的进展,因为从 SlidesPro 拖拽图片到另一个app上已经可以work了!
添加下列的property到
ViewController
中:
var indexPathsOfItemsBeingDragged: Set<NSIndexPath>!
添加下列方法到
ViewController
的
NSCollectionViewDelegate
extension中:
  // 1
func collectionView(collectionView: NSCollectionView, draggingSession session: NSDraggingSession, willBeginAtPoint screenPoint: NSPoint, forItemsAtIndexPaths indexPaths: Set<NSIndexPath>) {
indexPathsOfItemsBeingDragged = indexPaths
}
// 2
func collectionView(collectionView: NSCollectionView, validateDrop draggingInfo: NSDraggingInfo, proposedIndexPath
proposedDropIndexPath: AutoreleasingUnsafeMutablePointer<NSIndexPath?>, dropOperation proposedDropOperation: UnsafeMutablePointer<NSCollectionViewDropOperation>) -> NSDragOperation {
// 3
if proposedDropOperation.memory == NSCollectionViewDropOperation.On {
proposedDropOperation.memory = NSCollectionViewDropOperation.Before
}
// 4
if indexPathsOfItemsBeingDragged == nil {
return NSDragOperation.Copy
} else {
return NSDragOperation.Move
}
}
一步一步来看上述代码:
-
当拖拽回话即将开始时,一个
optional的方法就会被调用。你将使用跟这个方法来保存被拖拽的item。当这个property不为nil时,就表示 Drag Source 是这个collection view。 - 实现放置的相关代理方法。这个方法会方法将要执行的操作的类型。
- 在 SlidesPro 中,item并不能充当一个容器;因此只能在item之间进行拖拽,而不能把一个item放到另一个item上。
-
当在collection view中移动item时,操作类型为
Move。而当 Dragging Source 是另一个app的时候,操作类型就为Copy。
运行项目。
拖拽一个item。在你移动它之后,你就会看到一些带有文字的奇怪的灰色矩形。在你移动它经过其它item的时候,相同的矩形也出现在了item之间。

神马情况?
在
ViewController
中,找到这个
DataSource
方法,它会在collection view请求一个supplementary view时被调用:
  func collectionView(collectionView: NSCollectionView, viewForSupplementaryElementOfKind kind: String, atIndexPath indexPath: NSIndexPath) -> NSView {
let view = collectionView.makeSupplementaryViewOfKind(NSCollectionElementKindSectionHeader, withIdentifier: "HeaderView", forIndexPath: indexPath) as! HeaderView
view.sectionTitle.stringValue = "Section (indexPath.section)"
let numberOfItemsInSection = imageDirectoryLoader.numberOfItemsInSection(indexPath.section)
view.imageCount.stringValue = "(numberOfItemsInSection) image files"
return view
}
当你开始拖拽一个item的时候,collection view的布局就会请求“过渡间隔指示器”的supplementary view。上述的
DataSource
方法无条件地假定这是一个对header view的请求。因此,就会返回header view作为“过渡间隔指示器”。
这些东西对你来说都是没用的,因此,用下列代码来替换这个方法的内容:
  func collectionView(collectionView: NSCollectionView, viewForSupplementaryElementOfKind kind: String, atIndexPath indexPath: NSIndexPath) -> NSView {
// 1
let identifier: String = kind == NSCollectionElementKindSectionHeader ? "HeaderView" : ""
let view = collectionView.makeSupplementaryViewOfKind(kind, withIdentifier: identifier, forIndexPath: indexPath)
// 2
if kind == NSCollectionElementKindSectionHeader {
let headerView = view as! HeaderView
headerView.sectionTitle.stringValue = "Section (indexPath.section)"
let numberOfItemsInSection = imageDirectoryLoader.numberOfItemsInSection(indexPath.section)
headerView.imageCount.stringValue = "(numberOfItemsInSection) image files"
}
return view
}
上述代码:
-
你根据接受到的
kind参数,设置了一个identifier。如果它不是header view的话,你就将identifier设置为一个空的String。当你传递给makeSupplementaryViewOfKind方法的identifier不能匹配任何的类或nib文件,它就会返回nil。当返回nil的时候,collection view就会使用默认的“过渡间隔指示器”。当你需要使用自定义一个指示器的时候,你就可以创建一个nib文件(就像你在header中做的一样),并将它的identifier传进来。 - 当它是一个header view的时候,你就像之前一样设置它的label。
makeItemWithIdentifier
和
makeSupplementaryViewOfKind
方法中,Swift的API中存在一个bug。它们的返回值被指定为
NSView
类型,但这些方法是有可能返回
nil
的。所以返回值应当是
NSView?
类型的吗 -- 问好也是这个值的一部分。
运行项目。
现在当你拖拽一个item的时候,你就会看到一个明显的竖线,表示item将会被放置到的位置。它是collection view已经准备好接收item的标志。

已经有那么几分意思了。但当你尝试把item放下的时候,它仍会弹回到原来的位置,因为处理接收item的方法还没有实现。
为
ImageDirectoryLoader
添加下列方法:
  // 1
func moveImageFromIndexPath(indexPath: NSIndexPath, toIndexPath: NSIndexPath) {
// 2
let itemBeingDragged = removeImageAtIndexPath(indexPath)
let destinationIsLower = indexPath.compare(toIndexPath) == .OrderedDescending
var indexPathOfDestination: NSIndexPath
if destinationIsLower {
indexPathOfDestination = toIndexPath
} else {
indexPathOfDestination = NSIndexPath(forItem: toIndexPath.item-1, inSection: toIndexPath.section)
}
// 3
insertImage(itemBeingDragged, atIndexPath: indexPathOfDestination)
}
上述的代码:
- 当item被移动的时候,就会调用这个方法来更新model
- 从model中移除被拖拽的item
- 重新插入到model的新的位置上
通过添加下列的方法到
ViewController
的
NSCollectionViewDelegate
extension中来把拖拽的过程收尾:
  // 1
func collectionView(collectionView: NSCollectionView, acceptDrop draggingInfo: NSDraggingInfo, indexPath: NSIndexPath, dropOperation: NSCollectionViewDropOperation) -> Bool {
if indexPathsOfItemsBeingDragged != nil {
// 2
let indexPathOfFirstItemBeingDragged = indexPathsOfItemsBeingDragged.first!
var toIndexPath: NSIndexPath
if indexPathOfFirstItemBeingDragged.compare(indexPath) == .OrderedAscending {
toIndexPath = NSIndexPath(forItem: indexPath.item-1, inSection: indexPath.section)
} else {
toIndexPath = NSIndexPath(forItem: indexPath.item, inSection: indexPath.section)
}
// 3
imageDirectoryLoader.moveImageFromIndexPath(indexPathOfFirstItemBeingDragged, toIndexPath: toIndexPath)
// 4
collectionView.moveItemAtIndexPath(indexPathOfFirstItemBeingDragged, toIndexPath: toIndexPath)
} else {
// 5
var droppedObjects = Array<NSURL>()
draggingInfo.enumerateDraggingItemsWithOptions(NSDraggingItemEnumerationOptions.Concurrent, forView: collectionView, classes: [NSURL.self], searchOptions: [NSPasteboardURLReadingFileURLsOnlyKey : NSNumber(bool: true)]) { (draggingItem, idx, stop) in
if let url = draggingItem.item as? NSURL {
droppedObjects.append(url)
}
}
// 6
insertAtIndexPathFromURLs(droppedObjects, atIndexPath: indexPath)
}
return true
}
// 7
func collectionView(collectionView: NSCollectionView, draggingSession session: NSDraggingSession, endedAtPoint screenPoint: NSPoint, dragOperation operation: NSDragOperation) {
indexPathsOfItemsBeingDragged = nil
}
上述的代码:
- 他会在用户释放鼠标来完成拖拽操作时被调用。
- 当它是一个移动的操作的时候,代码就会执行到此处。
- 更新model
- 将数据的变化通知给collection view。
- 当从其它的app接收到拖拽的东西时,代码则会执行到此处。
-
用从
NSDraggingInfo中获取的 URLs ,去调用ViewController中的 Add 方法。 -
调用结论性的方法。清除
indexPathsOfItemsBeingDragged的值。
运行项目。
现在你就可以将单个的item移动到同一section上不同的位置上了。同时也可以从另一个app拖拽一个或多个item到这里了。
现在SlidesPro还不能支持在不同section之间进行拖拽移动。并且一次接收多个对象,也必须得从SlidesPro外的app拖来才行。要在
UI
中禁用这些不支持的特性,可将第二个
if
语句中的
else
部分改为:
  func collectionView(collectionView: NSCollectionView, validateDrop draggingInfo: NSDraggingInfo, proposedIndexPath
proposedDropIndexPath: AutoreleasingUnsafeMutablePointer<NSIndexPath?>, dropOperation proposedDropOperation: UnsafeMutablePointer<NSCollectionViewDropOperation>) -> NSDragOperation {
if proposedDropOperation.memory == NSCollectionViewDropOperation.On {
proposedDropOperation.memory = NSCollectionViewDropOperation.Before
}
if indexPathsOfItemsBeingDragged == nil {
return NSDragOperation.Copy
} else {
let sectionOfItemBeingDragged = indexPathsOfItemsBeingDragged.first!.section
// 1
if let proposedDropsection = proposedDropIndexPath.memory?.section where sectionOfItemBeingDragged == proposedDropsection && indexPathsOfItemsBeingDragged.count == 1 {
return NSDragOperation.Move
} else {
// 2
return NSDragOperation.None
}
}
}- 这个拖拽只能在源头和目标匹配,且只有一个item被选中时才可以执行。
-
否则,就通过返回
.None来阻止拖拽动作的完成。
运行项目。尝试将item拖拽到另一个section中。指示器现在不会再展示出来了,代表这个拖拽动作是不可行的。
现在,拖拽多个选中的item。当拖拽到collection view的范围中时,并不会展示允许放置的指示;然而,将它拖拽到 Finder 中时,你会发现这种是允许的。
在上一部分,你会注意到一个关于高亮的问题。
为了便于清楚地进行讨论,被移动的这个item将被称作 Item-1 。在 Item-1 被放置到一个新的位置后,它仍会保持高亮, Add 和 Remove 按钮此时都是可用的,但选择现在却是空的。
为了确认这点是真实的,选择任一item -- 我们将其称作 Item-2 。如同设想中的一样,它变为高亮的,但 Item-1 仍保持着高亮。它本来应该是在 Item-2 被选择时,被取消选择和高亮的效果的。
点击item之间的任意位置以取消选择全部的item。 Item-2 的高亮效果消失了, Add 和 Remove 按钮也被禁用了,现在应当是没有任何的选择了,但 Item-1 却 仍然 是高亮的。
selectionIndexPaths
这个property上。在debug的时候,你就可以打印它的值。
所以到底是哪里出问题了?
显然,collection view成功地取消选择了
Item-1
,但
collectionView(_:didDeselectItemsAtIndexPaths: )
这个代理方法却未被调用,以将高亮的效果移除掉并禁用按钮。
在
NSCollectionView.h
中,collectionView(_:didDeselectItemsAtIndexPaths: )上面的注释中描述到,“在交互式选择后调用...”。因此,这些通知仅仅会在你通过UI选择或取消选择item时,才会调用这个方法。
这就是你的答案了,“夏洛克”:这个当你移动一个item时发生的取消选择的行为,是因为程序性地执行
NSCollectionView
的方法
deselectItemsAtIndexPaths(_:)
而触发的。
你需要重写这个方法。
依次点击 File \ New \ File… 创建一个新的名为 CollectionView 的 Cocoa类 ,它是 NSCollectionView 的子类,并将它放到 Views 这组中。
默认可能会添加一个
drawRect(_:)
方法 -- 将其删除掉。

添加下列的方法到
CollectionView
中:
  override func deselectItemsAtIndexPaths(indexPaths: Set<NSIndexPath>) {
super.deselectItemsAtIndexPaths(indexPaths)
let viewController = delegate as! ViewController
viewController.highlightItems(false, atIndexPaths: indexPaths)
}
这个方法首先会调用其父类的实现,然后在调用它的delegate的
highlightItems(_:atIndexPaths:)
方法,并相应地让
ViewController
高亮/取消高亮item,打开使用/禁用按钮。
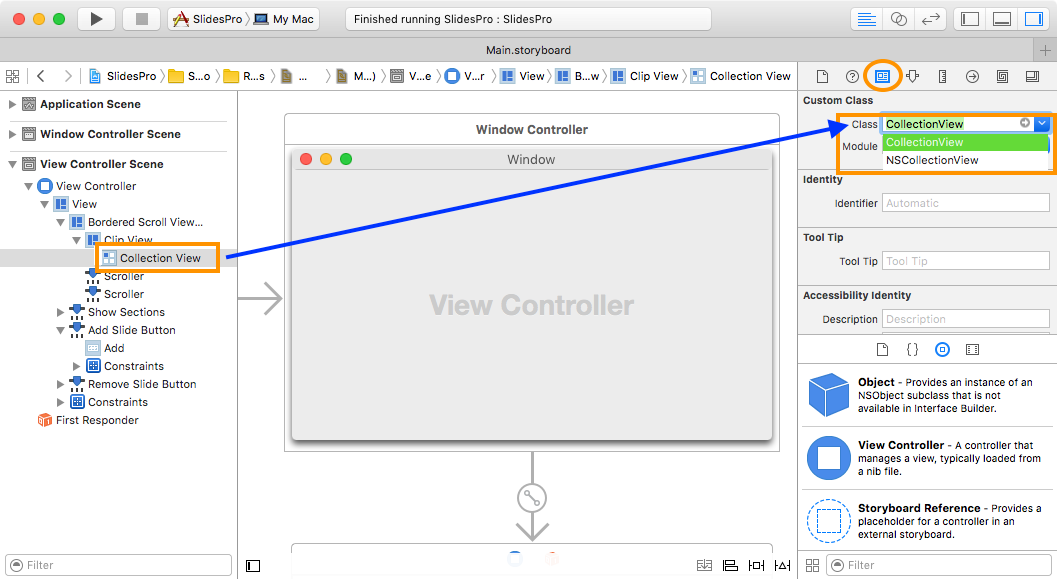
打开 Main.storyboard 并选择 Collection View 。在 Identity Inspector 中,将 Class 改为 CollectionView 。
运行项目。
在collection中将一个item移动到一个不同的位置上。现在没有高亮的项目出现了,按钮也如同期望的一样被禁用了。问题解决。
NSCollectionView
,作为
NSView
的子类,可以通用动画代理来执行动画。在诸如移除item的操作之前,它就和你在代码中添加一个单词一样的容易。
在
ViewController
中,
removeSlide(_:)
方法的尾部,将代码:
collectionView.deleteItemsAtIndexPaths(selectionIndexPaths)替换为:
collectionView.animator().deleteItemsAtIndexPaths(selectionIndexPaths)运行项目
选择几个item并点击 Remove 按钮。你会看到item在屏幕中滑动到了新的位置。
动画默认的持续时间是四分之一秒。如果想要体验一个更酷的效果,可以把动画的持续时间替换为一个更高的值。把你上面刚刚添加的这行代码替换为:
    NSAnimationContext.currentContext().duration = 1.0
collectionView.animator().deleteItemsAtIndexPaths(selectionIndexPaths)
运行项目,移除一些项目。效果赞不?
你可以在添加item时,为
insertItemsAtIndexPaths
做相同的事,同理也适用于使用
moveItemAtIndexPath
方法移动item时的情况。
当你使用section header滚动collection view时,这个section在屏幕顶部消失的第一个元素会是header。
在这一部分,你将实现 黏性的Headers ,section顶部的header将把自己固定在collection view的顶部。它会将自己的位置保持到下一个section的header把它顶出去为止。

为了让效果显得更加真实,你将撰写一个
NSCollectionViewFlowLayout
的子类。
依次点击 File \ New \ File… ,并创建一个新的名为 StickyHeadersLayout 的 Cocoa类 ,它是 NSCollectionViewFlowLayout 的子类,并将它放到 Layout 组中。

在
ViewController
中,将
configureCollectionView()
的第一行改为:
let flowLayout = StickyHeadersLayout()
现在通过添加下列的方法到
StickyHeadersLayout
内来实现黏性headers:
  override func layoutAttributesForElementsInRect(rect: NSRect) -> [NSCollectionViewLayoutAttributes] {
// 1
var layoutAttributes = super.layoutAttributesForElementsInRect(rect)
// 2
let sectionsToMoveHeaders = NSMutableIndexSet()
for attributes in layoutAttributes {
if attributes.representedElementCategory == .Item {
sectionsToMoveHeaders.addIndex(attributes.indexPath!.section)
}
}
// 3
for attributes in layoutAttributes {
if let elementKind = attributes.representedElementKind where elementKind == NSCollectionElementKindSectionHeader {
sectionsToMoveHeaders.removeIndex(attributes.indexPath!.section)
}
}
// 4
sectionsToMoveHeaders.enumerateIndexesUsingBlock { (index, stop) -> Void in
let indexPath = NSIndexPath(forItem: 0, inSection: index)
let attributes = self.layoutAttributesForSupplementaryViewOfKind(NSCollectionElementKindSectionHeader, atIndexPath: indexPath)
if attributes != nil {
layoutAttributes.append(attributes!)
}
}
for attributes in layoutAttributes {
// 5
if let elementKind = attributes.representedElementKind where elementKind == NSCollectionElementKindSectionHeader {
let section = attributes.indexPath!.section
let attributesForFirstItemInSection = layoutAttributesForItemAtIndexPath(NSIndexPath(forItem: 0, inSection: section))
let attributesForLastItemInSection = layoutAttributesForItemAtIndexPath(NSIndexPath(forItem: collectionView!.numberOfItemsInSection(section) - 1, inSection: section))
var frame = attributes.frame
// 6
let offset = collectionView!.enclosingScrollView?.documentVisibleRect.origin.y
// 7
let minY = CGRectGetMinY(attributesForFirstItemInSection!.frame) - frame.height
// 8
let maxY = CGRectGetMaxY(attributesForLastItemInSection!.frame) - frame.height
// 9
let y = min(max(offset!, minY), maxY)
// 10
frame.origin.y = y
attributes.frame = frame
// 11
attributes.zIndex = 99
}
}
// 12
return layoutAttributes
}
ok,发生了好多的事,我们一部分一部分来看:
- 父类方法返回了一个可见元素的属性的数组。
-
这个
NSMutableIndexSet对象首先会收集所有的至少含有一个可见的item的section。 -
从这个set中,移除所有header早已在
layoutAttributes中的section,只留下“缺少Header”的section。 -
获取缺少header的section的attribute,并添加到
layoutAttributes中。 -
便利
layoutAttributes但只处理headers。 - 设置可见区域顶部的坐标,也就是说滚动的偏移。
- 这么做,让header从不超过所属section中的第一个item上边界一个header的高度。
- 这么做,则让header从不超过所属section中的最后一个item下边界一个header的高度。
-
可将这里拆分为两步:
-
maybeY = max(offset!, minY):当这个section的顶部位于可见区域的上方时,就会将header固定到可见区域的顶部。 -
y = min(maybeY, maxY):当从section底部到可见区域顶部的距离,小于header的高度的时候,它就只展示header底部的一部分,以适应这部分空间。
-
- 更新header的垂直位置。
- 把item放置到header的下面。
- 返回更新后的attributes.
添加下列的方法到
StickyHeadersLayout
中:
  override func shouldInvalidateLayoutForBoundsChange(newBounds: CGRect) -> Bool {
return true
}
你将总是返回
true
,因为你想要在用户滚动collection view时清除原先的布局。
运行项目。
滚动collection以观察黏性header实际的效果。

可以从 这里 下载 SlidesPro 的最终版本。
在这篇OS X的高级Collection View教程中,你已经学习了很多的内容!你已把它从一个最基本的app,发展成了任何Mac用户所期望的,包含各种铃声和口哨等各种特性的app。
在所有的辛勤工作之后,你已经可以添加和删除item,重新排序它们,排查错误以及纠正高亮/选择的问题。并且通过添加动画和实现黏性header给SlidesPro以一个优雅的外表,将它提升到了下一等级。
留下最深印象的是,你现在已经知道了如何在OS X中构建一个功能丰富,优雅的collection view。考虑到关于它的文档相当地有限,这是一个非常值得去拥有的技能。
在本教程中尚未覆盖到的主题还有:
-
通过直接继承
NSCollectionViewLayout来创建自定义的布局 - 使用 Cocoa Bindings 的“无Data Source”的collection views
在这篇 基本教程 的最后,推荐的一个资源,是来自Mic Pringle的优秀的视频教程系列 Custom Collection View Layout 。尽管它是一个iOS系列的教程,你可以找到很多用到有用的信息,也可以用到OS X的collection view上。